


by Dr. William Sen
Windows 11 makes it difficult to permanently disable updates because Microsoft uses several layers to restore or restart the update process. A simple registry change or stopping the Windows Update service is often not enough.
The manual process will blocks Windows Update through policy settings, services, scheduled tasks, and update protection mechanisms.
Important: This guide is for advanced Windows users. Disabling updates can expose your system to security vulnerabilities. Create a restore point or full backup before making changes.
What This Process Does
This process disables Windows Update by changing four areas of Windows:- Windows Update policy registry keys
- Windows Update-related services
- Windows Update scheduled tasks
- A protection task that keeps Windows Update disabled after reboot
Step 1: Open Command Prompt as Administrator
Click your windows icon on your task bar and type “cmd”.
Right click on your mouse and select “Run as administrator”.
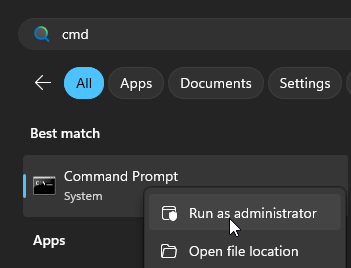
Step 2: Create a backup of the current Windows Update state
Before changing anything, export the relevant registry keys so you can restore them later.
Type this into the CMD window:
Also record the current service configuration. This will save 6 files on your desktop.
Step 3: Apply Windows Update policy registry values
Run these commands:reg add “HKLM\SOFTWARE\Policies\Microsoft\Windows\WindowsUpdate\AU” /v AUOptions /t REG_DWORD /d 2 /f
What it does is, it sets registry entries as described below:
NoAutoUpdate = 1 – disables automatic updates.
AUOptions = 2SetDisableUXWUAccess = 1 – disables access to the Windows Update user interface in Settings.
Step 4: Stop Windows Update-related services
Let’s stop these service now that cause windows to update automatically by running these commands in your CMD window:sc stop wuauserv
sc stop UsoSvc
sc stop BITS
sc stop DoSvc
sc stop WaaSMedicSvc
What it does is, these commands will stop thes services:
- wuauserv: That’s the Windows Update service
- UsoSvc: This is the Update Orchestrator Service if Windows
- BITS: This is the Background Intelligent Transfer Service
- DoSvc: This is for Delivery Optimization
- WaaSMedicSvc: Tihs is the so-called Windows Update Medic Service
All these services need to be stopped, otherwise Windows simply will restart Windows Updates automatically. And now that we have stopped them, we have to make sure they don’t start again. So, we will have to also “disable” from starting alltogether. So, do this:
Step 4: Disable the Windows Update-related services
Now we have to make sure these Windows Update services do not start again when Windows restarts. Run these commands on cmd:
sc config UsoSvc start= disabled
sc config WaaSMedicSvc start= disabled
sc config DoSvc start= disabled
We haven’t disabled BITS yet, intentionally. We need to stop BITS, ut have to avoid setting it to disabled. This is because BITS is also used by other Windows and application background transfer operations. So, let’s do that:
Step 6: Disable Windows Update scheduled tasks
Windows Update is also controlled through Task Scheduler. These are the folders that are resposible for Windows Update restarting even though you have stopped it:
\Microsoft\Windows\WindowsUpdate\
\Microsoft\Windows\UpdateOrchestrator\
\Microsoft\Windows\WaaSMedic\
\Microsoft\Windows\rempl\
\Microsoft\Windows\InstallService\
You can do this manually through Task Scheduler or by command line.
Option A: Disable tasks through Task Scheduler
Now type this into your commander:
taskschd.msc
And nwo open thse folders one by one:
Task Scheduler Library
– Microsoft
— Windows
— WindowsUpdate
Task Scheduler Library
– Microsoft
— Windows
— UpdateOrchestrator
Task Scheduler Library
– Microsoft
— Windows
— WaaSMedic
Task Scheduler Library
– Microsoft
— Windows
— rempl
Task Scheduler Library
– Microsoft
— Windows
— InstallService
For each task inside these folders, right-click the task and choose:
“Disable”
Some tasks may not allow you to disable them. Windows may show an access denied message. That is normal on protected Windows 11 installations.
I have even programmed a tool that allows you to stop Windows Services that usually don’t allow it:
If you want to do this also manually, here is how you can disable tasks through the command prompt. Enter this:
schtasks /Query /FO LIST /V
Then disable individual tasks like this:
schtasks /Change /TN “\Microsoft\Windows\WindowsUpdate\Scheduled Start” /Disable
Example commands:
schtasks /Change /TN “\Microsoft\Windows\WindowsUpdate\Scheduled Start” /Disable
schtasks /Change /TN “\Microsoft\Windows\UpdateOrchestrator\Schedule Scan” /Disable
schtasks /Change /TN “\Microsoft\Windows\WaaSMedic\PerformRemediation” /Disable
Task names vary by Windows version, build, edition, and update state. If a command says the task does not exist, check the exact task name in Task Scheduler.
Step 7: Add a recurring protection task
We need to do something now that is not a simple Windows setting: we have to use a bundled file to generate a task and then then create a scheduled task under \Microsoft\BazeWindowsUpdateDisabler\Wub_task
We will name the bundled file “Wub_task.vbs” and the task we will create will be named “task.xml”. In order to do this you need wub.exe. You need to download it and start it.
You can get Wub.exe at github under this URL:
https://github.com/Hudrig0/Windows-Update-Blocker
So, once downloaded, run this wub.exe like so:
wub.exe /d /p
There is no way around wub.exe. But if you use the Windows Update Disabler, wub.exe is included and will all these tasks for you automatically.
Step 9: Reboot Windows
After making the changes, restart the computer:
shutdown /r /t 0
After reboot, Windows Update should remain blocked if the registry settings, service changes, disabled scheduled tasks, and protection task are all in place.